
📌 Disclaimer: This tutorial was first published in March 2015. Some links may no longer work and any pricing mentioned may be outdated. The techniques and methods, however, remain valid—so we're happy to keep sharing it.
When you love crafting just as much as we do, you might find yourself trying to hand-make just about anything. After completing our Ribbon Rose Wreath Tutorial, we simply couldn't get over our excitement of crafting ribbon flowers. Keeping the theme, but with a brand new technique, CraftOutlet.com is thrilled to show all our crafters how to make these Wire & Ribbon Daisies. Use them to adorn your wreaths, make a permanent centerpiece or even add them as an accessory to your hair or clothing!
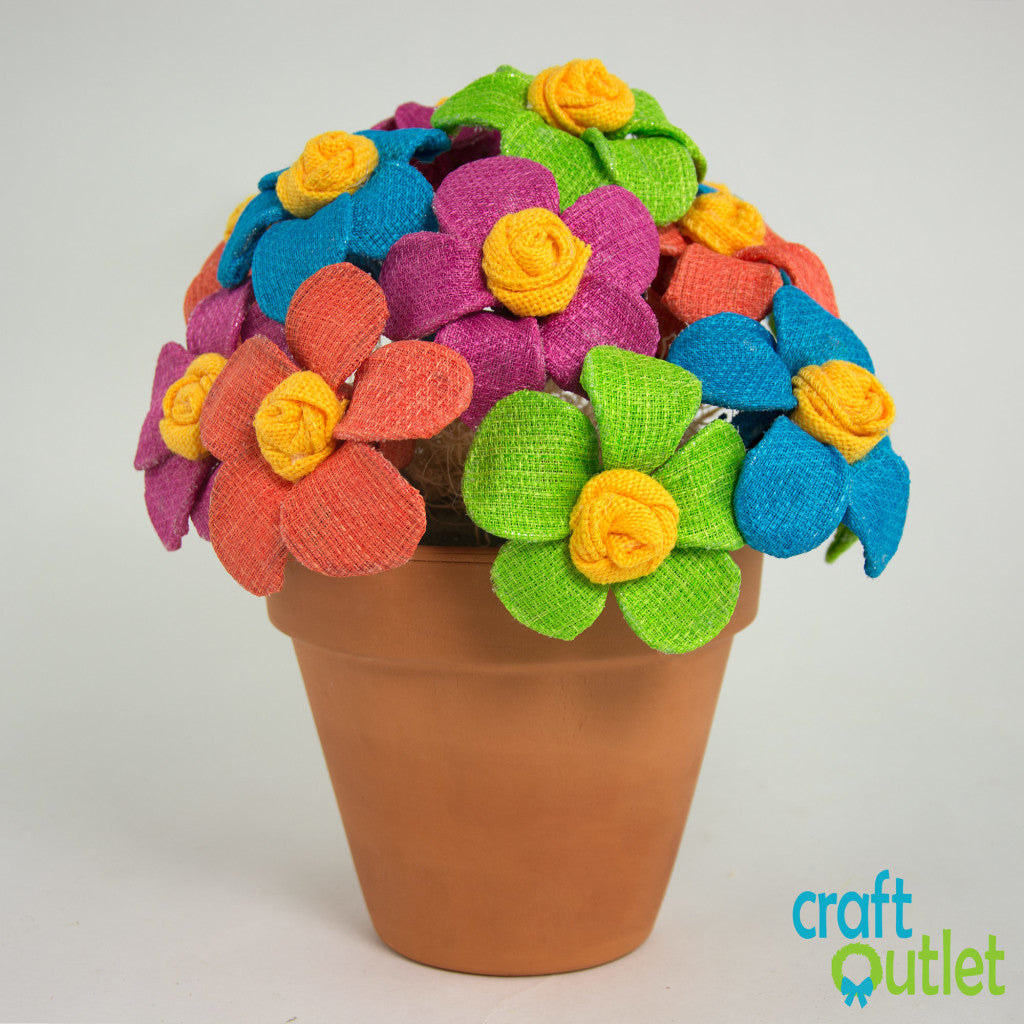
Supplies
(Yields three flowers each in four colors, twelve total)
- Aluminum Craft Wire* x2 (13 Yards per roll, we use about 20 Yards in total)
- 2.5" Hot Pink Royal Faux Burlap Ribbon (10 Yards, we use about 2 Yards)
- 2.5" Turquoise Blue Royal Faux Burlap Ribbon (10 Yards, we use about 2 Yards)
- 2.5" Lime Green Royal Faux Burlap Ribbon (10 Yards, we use about 2 Yards)
- 2.5" Salmon Royal Faux Burlap Ribbon(10 Yards, we use about 2 Yards)
- 2.5" Yellow Faux Burlap Ribbon (25 Yards, we use about 2.5 Yards)
You'll Also Need:
22-24 g Floral Wire, Scissors, Wire Cutters, and a Hot Glue GunOne daisy can be completed in about 20 minutes, taking approximately 3 hours for the dozen. Each Aluminum roll can make roughly 8 flowers, and each roll of ribbon can make nearly 18 flowers. In total, one flower takes 20" of ribbon and 58" of wire. When making a dozen, each flower should cost you under $3.
These flowers are versatile and flexible - literally! You can bend each petal exactly the way you want. For extra durability and security, after wrapping the base of the flower with floral wire, you can add hot glue to the center of the daisy before adding in the center accent. When adding the hot glue, do so carefully, as there is a potential for the hot glue to leak out while it's still very hot. This step will bond the petals and center accent together, creating a sturdier flower.
If you want to make these flowers in a different color or fabric, CraftOutlet.com has a great selection of ribbons suited for this tutorial! In addition to many more colors of the Faux Royal Burlap, we also suggest tighter-weaved Burlap Ribbons. For a softer, more luxurious look, we'd recommend our Dupioni Ribbons. Below we have an example of a bouquet with Gold-Flecked Burlap Ribbon. We created these flowers with the Gold Aluminum Wire.

To play off the glittered burlap, we created an equally dazzling and glitzy center accent. If you want to make these center accents, you'll need a black ribbon (we used our Chalkboard Ribbon because it had a nice matte finish), a Glittered Mesh Ribbon (we used Gold), and some old newspaper (or really any scrap paper will do!).

First we rolled the newspaper into a small ball, a little bit smaller than the size we'll need for the center of a flower. Next we took a small piece of the chalkboard ribbon and wrapped it around the ball, hot gluing the edges to the back. Last, we cut a piece of the mesh ribbon and layered it over the ball, also gluing those edges to the back. And Voila! we have an elegant looking center.
As for the original center accents, if you're having trouble creating them or need more info on how to make bigger ones, be sure to watch our previous tutorial on how to create a Ribbon Rose!
We assembled our flowerpot below by simply sticking a piece of dry floral foam in the bottom and pushing them stems into the floral foam. We then added a layer of natural colored excelsior on top.

Thanks for watching and shopping at CraftOutlet.com!