
📌 Disclaimer: This tutorial was first published in May 2017. Some links may no longer work and any pricing mentioned may be outdated. The techniques and methods, however, remain valid—so we're happy to keep sharing it.

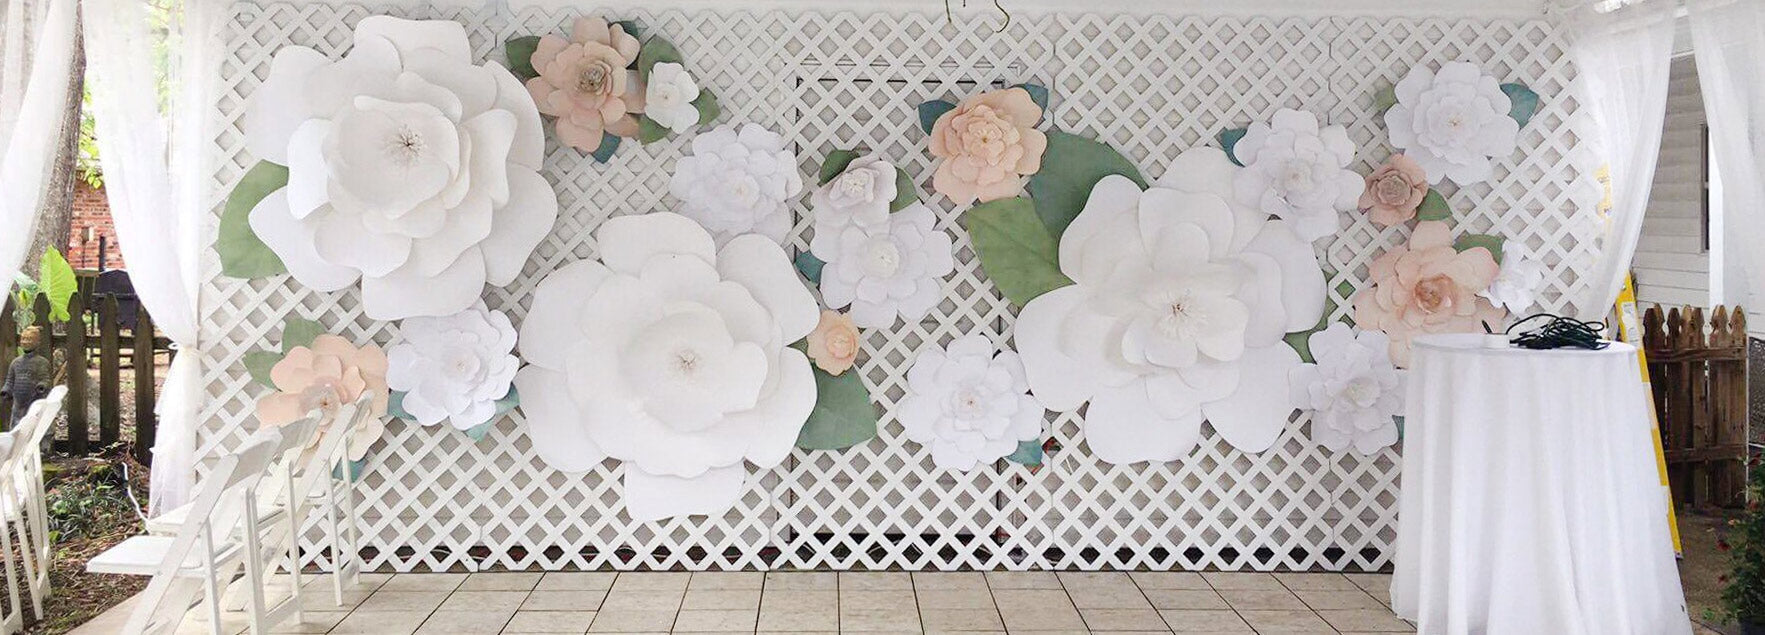
When one of Craft Outlet's own decided to have a backyard wedding, the couple was faced with the challenge of transforming the carport from an eyesore to eye candy on a budget. By making large paper flowers, they were able to add color, texture, and impact without breaking the bank.
The technique for making all the flowers is the same, no matter the size. We'll go over in depth how to make the largest flower and the leaves. At the end of the post, we will provide details and a template for the medium and small flowers.
:What You'll Need:
Supplies:
- 22x24 poster board (17-22 sheets yields one flower)
- hot glue gun http://www.craftoutlet.com/full-size-glue-gun-hot-temperature
- hot glue sticks http://www.craftoutlet.com/7-16-dual-temperature-glue-sticks-20
- pencil
- scissors http://www.craftoutlet.com/725-metal-scissors-black-handle
Cost: $7.40 (not including glue) per giant flower
Time: Approx. 45 minutes per giant flower. This includes the time needed for cutting the petals. Ask friends to help you cut to reduce your time!
:What To Do:
Step 1. Cut the petals
Start by tracing your petals. Don't worry about being perfect - flowers are organic and naturally full of variations. We have listed the dimensions here for reference, but yours don't have to match. The smallest petal takes about half a sheet. If you fit two petals on one sheet, you can get a full flower out of 17 sheets. If not, you will need 22 sheets for a full flower.
 The medium-sized petal takes about 3/4 of a sheet.
 The largest petal takes a full sheet.
Once you have them drawn, cut the petals out and use them as templates for the rest.

You will need to cut:
6 Large Petals
6 Medium Petals
10 Small Petals
TIP: Trace your petal template on a new sheet and stack it with 2-3 blank sheets and cut them all together. You'll save a lot of time by cutting two or three petals at once. Your edges might be a little rough because of cutting this way, but don't worry - no one will notice on the finished flower.
Once your petals are cut, separate them into piles according to size. We will begin with the large petals.
Step 2: Assemble the bottom layer of petals
Start gluing the large petals together at their base, turning them as you go to form a ring. This will be the first of four layers of petals, and it forms the base of your flower.

 Be generous with the glue so your flower will be sturdy.
TIP: For extra dimension, you can manipulate one or two petals to make them stand up more.
 Cut a slit in the bottom of the petal. Put glue on one side of the slit and overlap the pieces. The more you overlap the pieces, the higher the petal will "sit up." We recommend creating only two or three petals that sit up. For the lower three tiers of petals, don't let your petals sit up too high. We will make high-sitting petals for the center of the flower.
 Continue gluing petals together in a circular fashion. You can glue on the underside or the top - it's up to you.
 Don't be afraid of bending or creasing the paper if you have to. It won't show in the final flower.
 When you finish gluing together the six large petals, it should look something like this. We will now add three more layers of petals.
Step 3: Add a second layer with the medium-sized petals
The second layer of petals is composed of the medium-sized petals. Glue them in a ring, just as you did with the large petals.
 It looks best to center the medium petals over the spots where two large petals meet. You can use the "sit up" technique on this ring, too, if you like.
 Continue working until you have added all the medium-sized petals. The center hole should gradually reduce in size as you add more petals.
Step 4: Add a third layer using the small petals
Create another layer using five of the small petals. This will be your last layer before adding the petal cup. Start gluing the small petals the same way as before - take care to place them where the medium-sized petals overlap.
Step 5: Cover the center hole
 After you finish adding the small petals, you will probably still have a small hole in the center. Use some of your scrap paper to cut a circle large enough to cover it and glue it down. This will form the base for your petal cup.
Step 6: Make the petal cup
The petal cup is the center of the flower, which "sits up" more than the other petals, and it houses the stamens. Make each of the remaining five small petals "sit up" high, and glue them together.
 You will end up with something like this.
Set aside the petal cup for now.
Step 7: Make the stamens
 Take a scrap piece of paper and fold in half. The height of the folded paper should be about the same as the depth of the petal cup you just made. It can be shorter, but should not be longer. Cut 1/2 " strips, starting on the open edge and finishing about1.5" from the folded edge - do NOT cut all the way through!
 Once you have cut strips for the entire length of the scrap paper, start at one end and roll the paper into itself like a cinnamon roll, then fasten at the end with glue.
 You should now have a roll of stamens! Fluff them by bending the strips outward to make the grouping appear more full. Put A LOT of glue on the base of the stamen roll and attach to the center of the petal cup.
Step 8: Attach the petal cup
 Put glue on the underside of the petal cup and attach it to the the center of your flower.
Almost done! Now it's time for the fun part - curling the petals! Doing this gives your flower a more realistic appearance and adds volume.
Step 9: Curl the petals
 Take a pencil or any rounded object and wrap the edge of a petal around it. You can use your bare hands to make curls, too.
Your curls can be tight or loose. Make sure to do some that curl forward and some that curl backward. There is no pattern to this - just be random and have fun!
 Work your way around the flower, adding curls to each of the petals.
Step 10: Hang and Embellish with Leaves
 Once you are happy with your curls, you can hang your flower! You can use small nails or even push pins.
Making the Leaves
 Start by drawing a basic leaf shape and cutting it out. Remember, it doesn't have to be perfect - leaves are organic and have natural variations.
 Make a crease down the center of the leaf by folding in half, like a taco. Don't make a hard crease - just enough to show shape.
 To make the leaf veins, imagine V-shapes going down the length of the leaf. Use the side of your hand as a guide for the crease, and fold the paper upward against your palm. Repeat on the other side.
 Continue working your way down the leaf. You don't have to make hard creases. Just the act of bending the paper will make a strong enough indentation for the leafy effect. The spacing of the "V" creases is entirely up to you. Variation is desirable.
 You should end up with something like this. Tuck the base behind the large flower. We like using 2-3 leaves per flower.
:Making Your Wall Great:

To add visual interest to your wall, you will want to include various sizes of flowers. They look great in white, but we used spray paint to add color. Colored paper is another great styling option.
Supplies:
- 8.5"x11" cardstock - http://www.officedepot.com/a/products/458621/Neenah-Bright-White-Premium-Cardstock-Letter/
Cost: $1.27 per medium flower, $0.31 per small flower
Time: Approx. 20-45 minutes per flower
Medium Flowers
The medium-sized flowers are made the same way as the large flower, except you should use 8.5"x11" cardstock. We are including printable PDF templates for each petal size.For each flower, you will need to cut:
- 6-7 Large Petals
- 7 Medium Petals
- 12 Small Petals - 7 for a layer, and 5 for the petal cup
Large Petal Template
Medium Petal Template
Small Petal Template
Small Flowers
The small flowers are also made with the same technique as the others, but it has only one layer of petals and a petal cup. The petal cup is made with extra small petals, and the petal layer is made with small petals.For each small flower, you will need to cut:
- 5 Small Petals
- 5 Extra Small Petals