
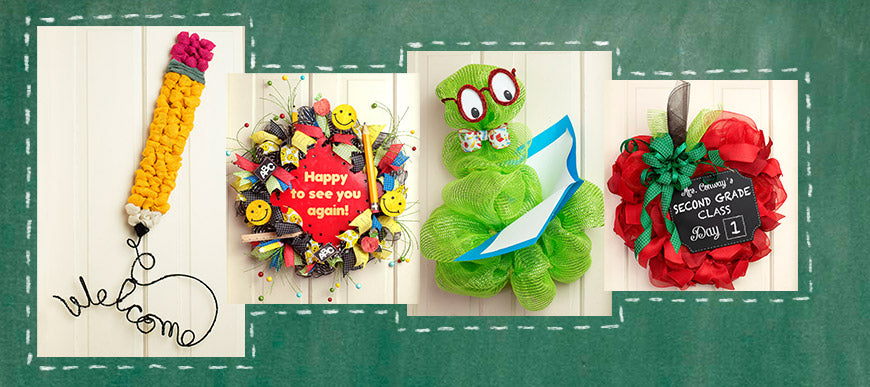
Welcome to our Back to School Projects post! We have four fun and exciting tutorials to share, spanning a range of materials, shapes, and skill levels to please all our crafters. Use the links below to jump directly to your favorite or scroll down to view them all.


Note: This blog post references some basic wreath-making skills. If you'd like to see how they are done, we have included links below:
Ruffle Method - Watch the video here. Start at 3:02 minutes.Pouf Method - Watch the first video on this page
Bows - Find many techniques on Google
Happy School Days
Primary colors (red, blue, and yellow) are a familiar way to go when designing a back to school theme. We brightened ours up with welcoming smiley faces and stuffed it choc-full of educational icons. Bonus - you can actually write with our oversized pencil!

Supplies:
15-24" Tinsel Work Wreath Form: Black10" Poly Deco Mesh: Wide Foil Metallic Black
2.5" Stitched Squares Ribbon: Black & White
2.5" Ruler Ribbon: Black & Yellow
2.5" Yellow Smiley Face Ribbon
2.5" Gingham Check Wired Ribbon: Lime Green & White
1.5" Stitched Squares Ribbon: Royal Blue & White
1.5" Swiss Dots Ribbon: Red & White
(2) 30" Metallic Glitter Back To School Floral Spray
29" Glitter Smiley Face Pick: Yellow & Black
12" Wooden Ruler
Giant Pencil
12" Scalloped Metal Sign Note Board: Red
Tools:
Rotary CutterCutting Mat
Scissors
Time:
About one hourCost:
About $60, but with lots of ribbon left over.Directions:
We used the ruffle method for the base of the wreath, with 10" cuttings of the black mesh. Any black mesh will work - striped, plaid, whatever your heart desires. Just limit any additional colors to red, blue, green, yellow, or white.After the mesh is in place, cut your ribbons and finish them with a dove tail cut. We made our ribbon cuttings 14-inches-long, and trimmed afterward if there was a wayward piece or two.
Now you can begin adding the picks. Cut each of them into three separate pieces and use the tinsel ties to attach them all around. Make sure the smiley faces are upright!
Finally, add your sign, pencil, and ruler. You can use paint markers to write on your sign, or you can find sticker letters on Amazon for a more finished look.
Tip: Hide the way your pencil and ruler are attached by using adhesive clips - just adhere a clip to the back of your object with the sticky side and use the clip to attach it to a tinsel tie!

Back To Top
Teacher's Apple
It is easy to get an apple shape with a heart-shaped work form when it is modified with a rectangular piece of plastic canvas situated at the bottom.

Supplies:
18 Inch Heart Wire Frame: 2-Wire White20mm Tinsel Tie Stems: Red
Plastic Mesh Canvas Sheet (22.5" x 13.5")
21" Poly Deco Mesh: Red
2.5" Royal Canvas Ribbon: Burgundy
Alternative: 2.5" Royal Faux Burlap Ribbon: Burgundy
2.5" Royal Faux Burlap Ribbon: Red
10" Poly Deco Mesh: Brown
10" Poly Deco Mesh: Metallic Apple/Lime
1.5" Stitched Squares Ribbon: Emerald & White
5/8" Glitter 2-Sided Ribbon: Emerald
Hanging Scalloped Edge Black Chalkboard Sign (12" x 10")
Tools:
Rotary CutterCutting Mat
X-Acto Blade
Scissors
Marker
Time:
About one hourCost:
$45.83Directions:
Apples look like hearts with flattened bottoms. We will use a heart-shaped work form for the base of our project, and add plastic canvas create a squarish-shape on the bottom. The plastic canvas provides a surface to add a few extra tinsel ties so that the mesh can follow the shape we want. Now you can add the tinsel ties to the rest of the bottom part of the frame. Do so at each crossbar.
 Finally, make a bow with the green ribbon and attach at the base of the stem. Now you are ready to add whatever sign you like!
Back To Top
TheoDoor the Bookworm
This lil' guy is great for teachers and librarians alike. Customize the paper in the folder with students' names, or take the cover off a required-reading book for a light-weight version of the real thing.

Supplies:
Worm:Tinsel Work Garland: Lime Green
21" Poly Deco Mesh: Metallic Lime Green
2.5" School Rocks Ribbon
Metallic Tinsel Stems: Red
Book:
Oversized cardstock
8.5x11 printer paper
Tools:
Glue GunGlue Sticks
Scissors
Marker
Time:
About 45 minutesCost:
$20.19Directions:
The body of the worm is made by using the pouf method up one side of a garland and down the back. This enables you to create 360 degree poufs that resemble the segments of a worm. Here is what one side of the garland should look like after you work all the way down. Keep the poufs by the ends smaller than the ones in the middle to create a tapered look.
When you reach the opposite end (this is his tail), repeat what you did before and loop the mesh OVER the end and continue making poufs all the way up the other side of the garland.
Now we need to make his body curl so that you can tuck a book inside.
You can remove the cover of a hard cover book, too:


Now all you need to do is make a bow, secure it around his neck, and give him some good reading material! Use hot glue or adhesive hooks to secure the book to his body.

Back To Top
Burlap Pencil Video Tutorial
We have published this video before, but since it is so relevant to this post and was previously so well-received, we thought it was worth posting again.
 Click the image to watch the tutorial
We hope you enjoy preparing for the school year with these fun projects, and we'd love to see your results -post your pictures on our Facebook page.
Happy Crafting!
Back To Top